Thursday, February 25, 2010

C098 Puzzled


Prepare card by folding 81/2 x 51/2” colonial blue cardstock in half. Crease with a bone folder. Stamp edges with lines image G.0267 page 177 using black Memories ink. Set aside.
Cut off white cardstock 41/4 x 51/2”. Create background by pouncing with a crumpled piece of wax paper and Vivid Storm Blue ink. Over stamp with the baby background by Posh Impressions. Rip edges and adhere to card front. Set aside.


Cut tag from off white cardstock. Lightly DTP using Dune and Velvet colorbox ink. Over stamp with background stamp by Stampendous. Mount on to black cardstock and trim close. Punch 1/8” hole at the top. Add 8” each of pink and off white yarn. Mount tag on an angle to center of the card. Set aside.


DTP a small scrap of off white cardstock with Dune and Velvet colorbox inks. Over stamp with postage stamp 24.019.G page 365 using black Memories ink. Trim close to border with postage stamp scissors. Mount onto black cardstock and trim close. Adhere to the bottom left corner of the card using a mount. Set aside.


Stamp face 17.071.G page 279 on to wrong side of a larger puzzle piece using black Memories ink. Color with pencil crayons. Cover with clear embossing ink then clear embossing powder. Heat to a shine. Adhere to center of tag. Set aside.


DTP Velvet ink to wrong side of two smaller puzzle pieces. Adhere one to the top and the other to the bottom right of the card.

This is the phrase I put in the inside (above).  I found an article on page 135 in the CK October 2002 magazine that explains how to create Text Boxes in Word. I tried it and it actually works!


Open Word -> Insert -> Text Box.


Hold left mouse button down to create a box on the page.


Inside the text box, type your phrase using the font, font size and font color of your choice.


Size the box.


Place your cursor on the black line of the text box and right click.


A menu will drop down. Click on ‘Format Text Box’.


Fill -> colors -> click on No Fill.


Line -> colors -> click on No Line. That is it!


First taught this class on April 19, 2007.


Tuesday, February 23, 2010

M102 Happy Anniversary


Main image - 19.033.M page 77.  Colored with markers.

Leaf - 14.138.C page 82.  Stamped with white dye ink.

Crack - H.0303 page 242.  Stamped with silver Colorbox.

Phrase by PSX.


Friday, February 19, 2010

C072 Rubber Cement

Prepare card by folding 51/2” x 81/2” yellow cardstock in half with a bone folder. Set aside.
Cut purple cardstock 51/4 x 4”. Punch each corner with the Crown Corner Punch. Adhere to card front. Set aside.


Drizzle rubber cement over 5” x 33/4” white watercolor paper. Let dry – should only take a few minutes. Randomly stamp pansies H.0064 page 100 using Berry Blaze Kaleidacolor rainbow ink. With a wet paintbrush, lightly brush the entire panel on the diagonal. Allow to dry a few minutes.


Rub the rubber cement off the paper. It will rub off very easily with and will not damage the fibres of your paper. Punch corners with the Crown punch.


Using a wet toothbrush, splatter the watercolor paper with yellow acrylic paint. When dry, adhere to the card front. Set aside.


Cut yellow cardstock 21/2 x 41/2”. Stamp with speckles H.0181 page 103 using purple ink. Purple emboss butterfly 03.054.M page 14. Cut out the butterfly using straight scissors on the straight lines and deckle scissors around the rippled edges. Bend wings upward and curl ends with a pencil. Mount to card.

First taught this class on March 11, 2003.

Wednesday, February 17, 2010

M062 Glittered Hearts

Prepare card by folding 81/2” x 51/2” turquoise cardstock in half with a bone folder. Set aside.


Cut pink cardstock 51/4” x 4”. Over stamp with the double hearts 08.046.F page 131 with Vivid pink ink and adhere to card front. Set aside.


Cut turquoise cardstock 23/4” x 43/8”. Over stamp with the tiny heart 01.047.B page 22 and Vivid turquoise ink. Adhere to the center of the card. Set aside.


Stamp the main image 08.048.N page 193 on bubble paper, brayer with clear embossing ink then heat emboss with Crystal EP. Adhere to the center of the card. The scan doesn’t show it but it is very glittery!

Monday, February 15, 2010

C064 Elegant Rose Corner


I placed a piece of pink paper behind the card so the scan would show up the card more.  Its really not there!

Prepare card by folding 81/2 x 51/2” ivory cardstock in half with a bone folder. Set aside.


Fold 81/2 x 51/2” vellum in half. Swipe the front with a static bag. Gold emboss the rose 09.145.K page 144 on an angle so that the bottom leaf is at the very edge of the card opening and the top of the rose is at the top of the card. Color rose with a pale pink and green marker from the wrong side. I used #67 bubble gum and #4 green Marvy Markers. When dry, cut out corner along the edges of the stamped image.


Gold emboss Happy Birthday 07.305.G page 228 on an upward angle on the left side of the card. Use an embossing pen and ruler to draw a ¾” border around the card. Emboss with gold powder. Attach vellum card to ivory card using a glue stick on the back only. Trim card if necessary. Set aside.


Cut pink mulberry paper 3 x 4”. Feather the edges with a wet paintbrush and cut on a diagonal. Glue one piece to the top right corner of the ivory card using a glue stick. Apply a bit of glue stick to the backside of the rose and adhere.

First taught this class on February 12, 2003.

Thursday, February 11, 2010

M026 Bleached Hearts


There is a considerable difference in results of bleaching depending on both the bleach and the cardstock.  The poorer quality cardstock bleaches whiter than the better quality stuff.  It's really interesting to make a palette using different brands of cardstock but in the same color and run a bead of bleach down the side.  You'll come up with a wide range of different shades.  I find that Javex bleach seems to be the strongest and lightens the best, if that is the effect that you are looking for.

Prepare card by folding 81/2” x 51/2” white cardstock in half with a bone folder. Crinkle a piece of wax paper and form into a ball. Pounce in to your Vivid Hot Red ink pad and on to your card front. Apply a piece of gold cardstock to the front. Set aside.

Gold embossed image 08.048.N page 193 on red cardstock. Using a fine paintbrush, paint to bleach certain areas of the image. This removes the color.

Adhere to white cardstock then on to the card front.

Tuesday, February 9, 2010

C034 Magenta LOVE


This was CASE’d from a card on the Program #5, Valentine’s Day by the Magenta artists.
Prepare card by folding 81/2” x 61/2” Rouge cardstock in half with a bone folder. Set aside.


Cut Apple Blossom cardstock 33/4” x 53/4”. Over stamp with the double hearts 08.046.F page 131 using Vivid Garnet ink. Adhere to center of card.


Cut Rouge cardstock 31/8” x 5”. Adhere to center of card.


Cut Apple Blossom cardstock 23/4” x 43/4”. Over stamp with the double hearts 08.046.F page 131 using Vivid Garnet ink. Cover this piece with a piece of white mulberry paper cut to the exact size. Adhere to center of card.


Stamp LOVE 07.194.Q page 111 with clear embossing ink. Emboss with Claret Tapestry EP by PSX. Cut out each letter and glue on top of the mulberry paper.

First taught this class on February 13, 2002.

Friday, February 5, 2010

C060 Those Little Stamps


Prepare card by folding 51/2” x 81/2” dusty rose cardstock in half with a bone folder. Rip around a piece of matching wallpaper and adhere to the center of the card. Set aside.

Trace a large heart on to dusty rose cardstock. Rip the edges of the heart. Swipe the ripped edges with a Versamark ink pad or trace with an embossing pen. Gold emboss. Over stamp with I.0296 page 233 using Versamark. Adhere to the center of the card. Set aside.


Stamp the face image 17.071.G page 279 using pink pastel Chalk ink. Trim with deckle scissors and mount on gold cardstock. Adhere to the bottom left side of the card.

First taught this class on November 20, 2002


Wednesday, February 3, 2010

M163 Open Heart


This was CASE’d from a card on the Program #5, Valentine’s Day by the Magenta artists.

Heart image is Magenta 08.028.Q page 22 stamped on Magenta Apple Blossom cardstock with black Memories ink. Colored with pencil crayons then cut out center with a craft knife. Stamped the script image by ‘Love to Stamp’ on purple cardstock using purple ink and inserted behind the heart. Mounted on to a pale pink card.

Monday, February 1, 2010

M187 Tri Shutter Valentines

I finally tried one of these cards! ! I have never tried them because they intimidated me and besides, who would want to make such a complicated card??!! I was surprised at how simple they are!

I did find that it is best to do ALL the prep work BEFORE putting the card together. If you haven’t tried making one, do so! You will enjoy it!

I have used a lot of words in my description but it is really quite simple. I have used only three colors of cardstock. Whatever you use as your card base, use that as your ink color for over stamping and sponging. Using purchased patterned paper makes the card go together quicker but I don’t use it very often … guess I feel I have enough stamps that I can make my own.


Stamps: Love is SU! Wonderful Words;
Lady Bugs is from the set called ‘Feelings’ created by Magenta artist Maryse Carrier;
Inside phrase is by PSX;
Heart with swirl is Magenta 08.069.G page 258;
Heart background is Magenta 08.076.K page 259;
Double heart is Magenta 08.046.F page 131;
Pink background is Magenta 14.432.P page 281;
Red background is Magenta 14.418.S page 257;


Ink: SU! Teal pigment and dye; Vivid Hot Red; Vivid Pink.


Cardstock: Hot Pink; Teal; Red; White.


Accessories: 12” ribbon, mounts, sponge, clear EP, Nesties oval scallop, Fiskars border punch.


Cut Teal cardstock 6” x 12”. Score in 2” and 4” from the left and right side. Cut from the first score line to the last score line at 11/2” from the bottom. Repeat at the top. Do NOT fold yet. Set aside.


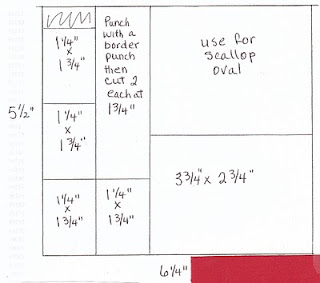
Cut hot pink cardstock 53/4 x 61/4”. Lightly trace these measurements on the wrong side just so there is no mistake when cutting. Over stamp with Magenta 14.432.P page 281 using Vivid pink ink to cover the front.  See below:
Cut red cardstock 51/2 x 61/4”. Lightly trace these measurements on the wrong side just so there is no mistake when cutting. If you are using a larger die than the oval I’m using, you will have to cut this piece wider and longer to allow for it. Over stamp with 14.418.S page 257 using Vivid Hot Red ink to cover the front. See below:
Now cut out the pieces. As you can see by the next photo, you have very little waste.
Do your over stamping now then sponge all the edges. See below. I placed a mount behind the white heart. Tie ribbon around the bottom large rectangle and tie a knot. Make sure your knot is to the right side of the rectangle. I layed my pieces on my card just to make sure everything fit.
I have not folded my card yet – it is much easier to work on a flat surface. Glue all your pieces on to the card. I added some mounts on the piece that I will be mounting my oval scallop. We will add our oval scallop after we have done the folding. See photo below.
Now start folding. The first fold next to the word Love has to be a mountain fold. See photo below. Next is a valley fold, then mountain fold etc. Open up the card and fold the middle piece only in opposite folds. Adhere oval scallop in place. That is it, you are done!
I received Tri Shutter cards from Irene and Sherry both off the CST stamping group I’m on. I kinda combined the two to come up with this one. There are also instructions on Splitcoaststampers HERE. Beate has a video at the bottom of that same page too.


Related Posts Plugin for WordPress, Blogger...